Published Lesson Plans

Posted in Other Stuff on May 7, 2013 by Ryan

Hi everyone!

This will probably be my last post to this site. It was part of a culminating high school project and I’m just about finished. One of my goals going into the project was to help others learn about food science and molecular gastronomy, so I designed a couple of experiments and a slideshow explaining everything I did in detail. In conjunction with my other blog posts, it should be easy to recreate almost everything I did. Here are the documents:

blog lesson plan

blog ppt

demo plan

experiment design


Feel free to leave comments; I’ll still read and publish them. Otherwise, thanks so much for the support on this site, and I encourage you all to explore molecular gastronomy!

🙂

The Science Behind Effervescence

Posted in The Science Behind It with tags , , , , , , , , on March 9, 2013 by Ryan

Recently, I tried making effervescent caramels, which were not super successful. However, the chemistry behind the particular type of effervescence I created is pretty simple and easy to understand.

The two additives I combined for the effervescent coating were citric acid and sodium bicarbonate. Citric acid is commonly used for both flavoring citrusy foods and acidifying solutions because it is found in many citrus fruits. It is also very important physiologically; it is involved in the oxidation of fats and proteins and it also facilitates the conversion of carbohydrates into carbon dioxide and water during cellular respiration. (Cellular respiration is the process by which we convert food into energy.) At room temperature, it exists as a white powder, which makes it easy to use in molecular gastronomy.

Don’t get any funny ideas.

Sodium bicarbonate is the main ingredient in baking soda and is a very unique chemical compound. It is amphoteric, which means that it can react with both acids and bases to neutralize the pH of both. Because of this, though, it is neither a very strong base nor a very strong acid, meaning that it can really only neutralize weak acids and bases.

Luckily for this reaction, citric acid is a weak acid! The chemical reaction that takes place between sodium bicarbonate and citric acid is as follows:

As can be seen from the fabulous diagram, the rightmost hydroxide functional group (OH) on the sodium bicarbonate combines with the leftmost carboxylic acid (COOH) on the citric acid to form carbonic acid. The leftover parts bond to make sodium citrate. Carbonic acid is a fairly weak compound and will fall apart, yielding water and carbon dioxide. This carbon dioxide is what we feel as the fizzy part of the reaction.

So why are we able to coat caramel with this mixture of powders without the fizz escaping right away? The compounds need an aqueous environment (more plainly stated, they need to be dissolved in water) to be able to interact enough to react. When the caramels are ingested, the saliva in your mouth provide enough moisture to allow this reaction to occur. As long as they are dry, the reagents won’t undergo the acid-base reaction to form fizzy carbon dioxide.

Well, that was probably the simplest chemical reaction that I’ve researched so far. Effervescence is extremely easy to create, even for novices in molecular gastronomy. I’m going to continue reviewing molecular gastronomy as I design my lesson plans, so stay tuned for more posts.

Effervescent Caramels

Posted in Molecular Gastronomy Techniques with tags , , , , , , , , on March 4, 2013 by Ryan

While I was excited to make some emulsions with soy lecithin, I found out that I actually forgot to order any. As a result, I found some sodium bicarbonate and citric acid to test out some effervescent candies.

The recipe I found called for soft toffees, of which I had none. Continuing the trend of improvisation, I went ahead and made some soft caramels from scratch. I first poured sugar, brown sugar, milk, cream, and butter into a pot to boil.

A brilliant concoction of fats and sugar.

A brilliant concoction of fats and sugar.

After ten to fifteen minutes, the mixture expanded while boiling and at one point almost boiled over the pot and onto the stove.

IMAG0531

I continued to boil it over medium heat for another half hour, watching it thicken, brown, and reduce over time.

IMAG0533

I realized that I don’t have a candy thermometer or any kind of cooking thermometer, for that matter. For one last time, I MacGyver’ed a solution to the problem, doing a search online to find an alternative method to test temperature. By dropping a little bit of the caramel into ice water, I was able to determine the texture and firmness it would take if I had stopped heating it at that point. When it came out of the bath with the right firmness, I removed it from the stove and added a little bit of vanilla. I then poured the caramel mixture into a 13X9 inch pan.

IMAG0535

It cooled for about an hour, then I cut the solid caramel sheet into little cubes. I then moved on to the effervescence mixture I was going to coat the caramels in. I tried three different coatings: a plain mixture of sodium bicarbonate and citric acid, a mixture of the two additives and sea salt (salted caramels!), and the two additives plus a little sugar. None of the mixtures tasted good. At all. The effervescence worked well, but the flavor from the citric acid was really strong and clashed with the caramels. For the second mixture, the salt was really overpowering, and reducing the amount of salt did little to help. Finally, the sugar plus the richness of the caramels was too much to handle. After tinkering with these ideas, I finally gave up and just wrapped my plain caramels:

IMAG0536

I probably won’t try doing this again because making caramels is such a time consuming process (it took me five hours, beginning to end), especially cutting and wrapping the individual pieces. I was able to experience the effervescence, which is the important part. Oh well. Now I just have about three pounds of unaltered caramels. Anyone want some?

The Science Behind Dry Ice and Liquid Nitrogen Ice Cream

Posted in The Science Behind It with tags , , , , , , , , , on March 3, 2013 by Ryan

Two cooling agents used pretty uniquely in molecular gastronomy are dry ice and liquid nitrogen, which are molecules that are commonly found in nature but are in a different form.

Dry ice is solid carbon dioxide, the gas version of which is in the air (at about a .035% concentration), in our bodies as we produce energy from glucose, and in carbonated drinks. The reason we typically only see carbon dioxide as a gas or as a solid has to do with its phase diagram:

The state of a substance (i.e. whether it’s a solid, liquid or gas) is dependent on two factors: pressure and temperature. Pressure on Earth is typically around 1 atmosphere, while temperature can vary depending on the location. As can be seen in the diagram, at 1 atm, carbon dioxide can either be a solid or a gas, but not a liquid; only at a pressure of 5.11 atm can we begin to see carbon dioxide in a liquid form.

Unlike water, which freezes at zero degrees Celsius, carbon dioxide freezes at -78.5 degrees Celsius. This is because of the great difference in their intermolecular forces. Water molecules experience hydrogen bonds with other molecules because they have such a strong dipole moment, meaning that the oxygen atom has such a strong pull on the hydrogen atoms’ electrons that the molecule develops a positive and negative charge. These charges are attracted to the opposite charges of other molecules, forming a tight-knit group of molecules, so water is a substance that is easy to freeze.While oxygen atoms have a great pull on carbon’s electrons in the carbon dioxide molecule, the symmetrical shape of the molecule gives a neutral charge on both sides. Because of this, carbon dioxide has few intermolecular forces and it is more difficult to force them to stick together as a solid as opposed to a free-flowing gas.

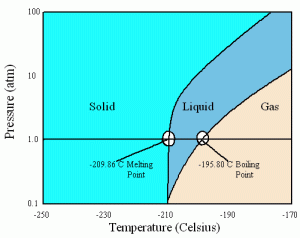
Liquid nitrogen, on the other hand, is usually seen in either liquid or gas form. Nitrogen, or N2, has a completely symmetrical structure with an extremely strong triple bond between the two nitrogen atoms. It has virtually no intermolecular forces, especially because the two nitrogen atoms attract electrons equally well, so it is extremely hard to force nitrogen molecules into liquid or solid states. Unlike carbon dioxide, nitrogen can exist in all three states at 1 atm:

nitrogen-phase-diagram

Its boiling point, at -195.8 degrees Celsius, is also lower than carbon dioxide’s freezing point, making liquid nitrogen colder than solid carbon dioxide.

Now, the question left is: why does pouring/adding dry ice or liquid nitrogen to a substance freeze it? The answer may seem simple (well, it’s cold!), but it’s a little more complicated than that. Temperature, be it in Fahrenheit, Celsius, or Kelvin, is a measure of energy (of the kinetic variety). When substances are surrounded by temperatures above their freezing/boiling points, the energy from that higher temperature will flow into the substance with the lower temperature in order to begin melting or subliming that substance. Until all of the substance is melted or sublimed, the unchanged portion of that substance will maintain the same temperature. It’s kind of confusing, so here’s an example: liquid nitrogen’s boiling point is at -195.8 degrees Celsius. If we pour one liter of it into a sorbet base at room temperature (about 25 degrees Celsius), the energy from the sorbet will go into evaporating the liquid nitrogen, thereby cooling the sorbet base and reducing the amount of liquid nitrogen. As long as there is liquid nitrogen in the bowl, though, its temperature will stay at -195.8 degrees. Eventually, when all of the liquid nitrogen has evaporated, the sorbet is probably at a temperature below the freezing point for water because so much energy has been removed from it. As such, at that point it would be a solid sorbet. It can be demonstrated by this graph:

Substances do not change temperature when they are in the process of changing phases. That’s the basic principle behind dry ice and liquid nitrogen ice creams.

Dry Ice Solidification and Carbonation

Posted in Molecular Gastronomy Techniques with tags , , , , , , , on February 22, 2013 by Ryan

We ran out of ice cream at my house, and I wanted to eat some yesterday, so I went ahead and made it myself. I didn’t know of anywhere to get liquid nitrogen on short notice, so I just decided to use dry ice (which is solid carbon dioxide) as a substitute. Since there is an age requirement to buy it, my dad bought me a 10 pound chunk from the grocery store, which was much more than enough to make the three quarts of ice cream that I had planned for.

I started by making the bases for my coffee and my vanilla ice creams the day before because I wanted to give the flavors ample time to develop. I started with 3 cups of heavy cream, heating it up on the stove before adding 3/4 cup of sugar and a cup of coffee beans:

I also used up all of the cinnamon...

I also used up all of the cinnamon…

For the vanilla ice cream, I followed a similar process, only adding vanilla extract in place of coffee beans:

Fun, fun, fun, fun, looking forward to the weekend.

Fun, fun, fun, fun, looking forward to the weekend.

I refrigerated the bases overnight, straining out the coffee beans in the morning because it was starting to get a little bitter. Surprisingly, the color of the coffee base barely changed, just becoming slightly darker and browner than it was to start with.

The next day, I made my berry sorbet base, blending a lot of berries with a little bit of water. I then strained it to remove the seeds from the mix:

All you Twihards out there can pretend it's blood.

All you Twihards out there can pretend it’s blood.

Finally, it was time to work with the dry ice! I don’t have a stand mixer, so I used a whisk and a large wooden spoon stir the dry ice into the bases. There was evaporated carbon dioxide everywhere while I did this, so much so that I didn’t really have the opportunity to take pictures. Here’s one that I managed to get:

IMAG0473

This part took much longer than I expected and was much more tricky to pull off correctly. I was unable to crush all of the dry ice into powder, so there were a lot of frozen chunks in the ice cream that eventually evaporated. However, if I plan to do this for the Bite of IS in a few weeks, I need to figure out how to do this quickly and without chunks.

In my opinion, the sorbet came out much better than the ice creams. I ended up whipping a lot of air into the ice cream bases so they turned out a little bit like whipped cream, at least texturally. When I put them in the freezer, they have more the consistency of really soft ice cream, which is good. The sorbet was just perfect: smooth, mostly flavored by the berries (not sugar), and very few chunks.

IMAG0517

I think I’ll do emulsifications with soy lethicin next. That seems fun and exciting.

The Science Behind Gelification

Posted in The Science Behind It with tags , , , , , , , , , , , , on February 19, 2013 by Ryan

Before doing research on gelification, I assumed that it was a simple chemical process because it was so easy to do in the kitchen. I was completely wrong.

Additives that are involved in gelification belong to a category called hydrocolloids. A colloid is a substance that evenly disperses within another, so hydrocolloids dissolve and disperse evenly throughout water. Hydrocolloids used in molecular gastronomy are polysaccharides made up of glucose molecules, which are polar. Therefore, they attract to water molecules, as shown by this fabulous diagram:

It’s a little more complicated than a ribbon and balls.

Anyways, water is attracted to the glucose molecules and, through intermolecular forces, become semi-immobilized. This is what creates a gel. Based on the specific structure of the hydrocolloid molecules, the characteristics of the gel differ. Various properties include:

  • Thermoreversibility: thermoreversible gels melt when heated and set when cooled again (except gels made from methylcellulose, which do the opposite). Thermoirreversible gels do not melt when heated.
  • Tendency for Syneresis: Syneresis is the extraction of a liquid (often water) from a gel. Firmer gels tend to “weep” more, especially when being thawed after having been frozen or when pressure is applied to the gel. Agar agar gels are a notable example of gels with a tendency for syneresis.
  • Freeze-thaw stability: This property kind of relates to syneresis. Some gels can be frozen and thawed repeatedly, but most degrade as their structural components are compromised. When multiple different kind of hydrocolloids are used in a gel, it is much more stable because of synergistic relationships between many of them.
  • Clarity: Some gels are more transparent than others.

jello3157129503_8e59cb2e67

  • Flavor release: This characteristic has to do with the textural properties of the hydrocolloid and how well it expresses the flavor of the liquid it has gelled. Gelatin, for example, melts at mouth temperature and therefore has great flavor release. Alginate is a very stable gel at body temperature, though, so it has poor flavor release.
  • Shear reversibility: Shear is the force that occurs when objects take a parallel path in opposite directions, like the action done by scissors. Shear reversible gels reform after being broken by this type of force, but most gels can’t.
  • Gel flow: hydrocolloids that thicken liquids are judged by the following flow properties:
    • Shear thinning: when mixed, most liquids thickened by hydrocolloids get less viscous. In this way, they are non-Newtonian liquids.
    • Yield point: These are liquids that act like a gel when at rest, but liquefy when sheared. These are called thixotropic fluids, a notable example of which is ketchup. It’s extremely hard to get flowing in those glass bottles, but when it does, it’s like a landslide.
    • Fluid gels: some gels look solid when on the plate, but act like fluids when in the mouth. Some agar gels look very solid but have a creamy, sauce-like texture in the mouth.

There are many different types of hydrocolloids (too many to list here!), most of which have different sets of properties. I’ll go into two of the most commonly used ones now: agar agar and carrageenan.

Carrageenan is an extract from red algae. There are three types of carrageenan: iota, kappa, and lambda, all of which have slightly different characteristics.

Iota carrageenan makes flexible, elastic gels in the presence of calcium ions. It is is fairly clear, but does not dissolve in cold water. My suspicion is that this is because iota carrageenan is not very polar, so the increased energy (or temperature) in the water molecules is necessary to develop intermolecular forces with the iota carrageenan molecules. As such, the solution must be heated to over 60 degrees Celsius to dissolve the carrageenan fully, and it will gel as it cools down.

Kappa carrageenan forms firm but elastic gels in the presence of potassium ions and brittle gels in the presence of calcium ions. The solubility and gelling processes are the same as iota carrageenan. It can be thinned with sugar and is thermoreversible.

Lambda carrageenan is not used for forming gels; rather, it is used solely as a thickening agent.

Agar agar is a hydrocolloid that forms heat-resistant gels while cooling between 32 and 43 degrees Celsius. It is able to retain its firmness up to about 85 degrees Celsius, or 185 degrees Fahrenheit, making it the optimum additive to make gels designed to be consumed while hot. It has much stronger gelling properties than gelatin, so a concentration of less than .01 molal is necessary. The firmness of these gels is directly proportional to the concentration of agar agar. High concentrations yield firm, brittle gels, while low concentration gels are “supple and fragile” (KitchenTheory.com). Agar agar is a very diverse hydrocolloid, also used to thicken pie fillings because of its heat resistance, stabilize ice creams in conjunction with other vegetable gums, create foams when put into a siphon. It is soluble only in water, not in alcohol or nonpolar liquids.

Well, that was a long winded post. Gels differ greatly based on the hydrocolloid(s) used to thicken them, so as you can imagine, there are near infinite combinations. I want to thank KitchenTheory.com, which really helped me understand the science behind gelification. I am working on trying liquid nitrogen ice cream next. Stay tuned!

Gelification!

Posted in Molecular Gastronomy Techniques with tags , , , , , , , , , , on February 10, 2013 by Ryan

This week, I experimented with agar agar and carrageenan, two principal ingredients in the technique gelification. Continuing my infatuation with desserts, I made banana gel with agar agar and chocolate custard with carrageenan.

I made the banana gel first, although my first attempt was unsuccessful. Anyways, I started with four simple ingredients: a banana, almond milk (some of my family is lactose intolerant), sugar, and agar agar.

Quality goods.

Quality goods.

I pureed the banana in my handy dandy Magic Bullet and poured it into a small pot, along with 1/3 cup of milk and a teaspoon of sugar. I then added 1g agar agar, mixing it constantly to prevent clumping and to ensure proper dispersion.

IMAG0433

On my first attempt, I got distracted for a second and the mixture was all clumped, so I added a little more milk. This proved to be a fatal error; that little bit of milk lowered the concentration of agar agar too much, so the mixture did not gel completely after being cooled. I realized this after I remembered reading that the concentration of a hydrocolloid (in this case agar agar) is directly proportional to the firmness of the gel. The gel I had created was not firm at all, to the point of being almost liquid.

My second attempt went much better because I made sure to keep stirring the mixture on the pot. I noticed that the mixture was thicker even while boiling, which I took to be a good sign. I molded the banana gel in two different ways. First, I took a syringe and pushed some of the mixture through a meter of plastic tubing. When it cooled, I was left with a flavorful banana noodle! I also poured it into a mini ice cube tray:

"How am I going to get it out of the tray...? Eh, I'll figure it out."

“How am I going to get it out of the tray…? Eh, I’ll figure it out.”

Getting the noodle out of the tube was easy. I just filled the syringe with air and pushed the noodle out (rather sloppily) onto a plate:

IMAG0442

The ice cube mold was a little harder. I took the most slender knife I could find and traced around each gel mold until I was able to flip over the tray and have the gel fall out. The result:

I have no idea why it turned brown...

I have no idea why it turned brown…

The gel wasn’t too firm, maybe about as firm as a banana. I stored it in the fridge and when I removed it, the gel was much firmer, more like hard ice cream.

Then, I made chocolate custard! Again, I started with four ingredients: 100g 70% dark chocolate, 35g sugar, 300mL almond milk, and 2g carrageenan.

IMAG0436

I melted the chocolate and dissolved the sugar into the milk on the stove, then added the carrageenan:

IMAG0438

The mixture seemed to get darker over time. I whisked it constantly, trying to incorporate as little air as possible.

I should be a hand model.

I should be a hand model.

I poured the hot mixture into three ice cream dishes, cooling them to room temperature before storing them in the fridge. They set quite well, forming a creamy custard with an earthy, sweet flavor. There was an unexpected tinge to the taste, which I suspect is from the almond milk, since the carrageenan is tasteless.

IMAG0444

It was really good. My next post will discuss hydrocolloids and the process behind gelification, which is actually very complex. Have a great day!

The Science Behind Spherification

Posted in The Science Behind It with tags , , , , , , , , , , , , on February 7, 2013 by Ryan

Earlier this week, I did spherification for the first time; you can find the link here. I searched into why this process occurs, and I found some interesting results.

The two main components involved in spherification are alginate strands, usually found in the additive sodium alginate, and calcium ions, which can come from calcium chloride, calcium lactate, or calcium gluconate. One of these ingredients is dissolved into a distilled water bath, while the other is dissolved in the liquid you want to spherify. It depends on whether you want to do basic spherification or reverse spherification based on the liquid’s properties.

The structure of an alginate strand is as follows:

When sodium ions (Na+) are bonded to the oxygens, the strand is fairly flexible and soluble in liquid. If a solution containing sodium alginate is dropped into a calcium ion bath, however, the calcium ions bond to the alginate strands, replacing the sodium ions. Calcium ions have a positive two charge (Ca2+), and therefore must make two bonds to complete their electron shell and become stable molecules. Because they are taking the place of sodium ions, they must make an additional bond to satisfy this requirement. The result looks something like this:

9005-35-0

The molecules are all stuck together in a huge network! This eliminates their flexibility, making them more rigidly bonded together. To us, this looks and feels like a thin gel, which makes up the spheres’ thin membrane.

There are a few caveats that we have to keep in mind when spherifying liquids. First, if a liquid contains a non-negligible amount of calcium, we must do reverse spherification as opposed to basic spherification (reverse spherification is the process of mixing calcium ions into the liquid and making a sodium alginate bath instead of the other way around). Doing basic spherification with this type of liquid would cause the alginate molecules to prematurely react with the calcium in the liquid, forming a huge network of alginate strands within the whole body of the liquid, instead of just making a small membrane around it. Reverse spherification solves this problem by increasing the calcium concentration in the liquid so that when dropped in the alginate bath, only the outer calcium ions react with the strands of alginate, forming a sphere.

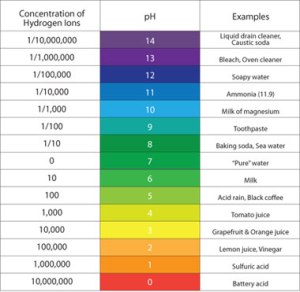
The second problem is when the liquid’s pH is too low. This may not seem like a significant problem at first, but can pose a real challenge to spherifying citrusy liquids. A low pH indicates a high concentration of hydrogen ions (H+), as shown by this chart:

pH_scale

When pH levels are below 5, the concentration of hydrogen ions is very large, and this increases their reactivity. When alginate molecules are in contact with a liquid with both calcium ions and a low pH, many of the molecules will react with the hydrogen ions instead of the calcium ions. Hydrogen ions have the same charge as sodium ions, so they will not need to bond with other alginate strands to complete their electron shells. As a result, the alginate strands will remain as flexible as they were with the sodium ions and no gel will form. We must add sodium citrate to liquids with low pHs to react with the excess hydrogen ions, allowing the calcium ions to react with the alginate strands more readily.

Finally, basic spherification does not last a long time because of one simple reason: there are too many alginate strands within the sphere to go unreacted for an extended period of time. The calcium ions will find a way to react with the remaining alginate molecules, and as they do so, the huge network of atoms that makes up the membrane will extend inwards. The liquid inside the membrane will eventually all be part of the network and it will feel more like a squishy gel than caviar. This does not happen with reverse spherification because the calcium ions within the membrane have nothing to react with; the alginate strands have either already all reacted or been rinsed of after spherification. This leaves the liquid on the inside with its original lack of a rigid structure.

Well, that was a long explanation of spherification. Even though it may sound complicated, it really is one of the most simple reactions in molecular gastronomy because it has so few reactants and products. Next time, I’ll be trying gelification. It’ll be fun!

Spherification

Posted in Molecular Gastronomy Techniques with tags , , , , , , , , , on February 5, 2013 by Ryan

This is my first crack at doing molecular gastronomy! I’m excited. I picked up three different types of drinks at Uwajimaya:

That middle can is a little bit sketchy.

That middle can is a little bit sketchy.

And I ended up using just the iced tea and coconut juice. I first did reverse spherification with the coconut juice, since it has a decent amount of calcium.

That's precision.

That’s precision.

I started by measuring out 1.0g of sodium alginate and adding about 200g of water to the bowl. I made sure to buy distilled water so that there would be no calcium ions to prematurely join the strands of sodium alginate. After mixing the 0.005m (molal) bath with my new best friend, the immersion blender, I noticed that the sodium alginate was having issues dissolving all the way. I blended it further and left it in the fridge so that the air bubbles would escape. I then started the coconut juice solution. When buying the coconut juice, I was unaware that there were chunks of coconut flesh in the can, so I had to strain it before adding the calcium chloride. I removed the sodium alginate bath from the fridge, and set out my little assembly line:

Left to right: coconut juice, algin bath, water bath.

Left to right: coconut juice, algin bath, water bath.

This attempt at spherification was somewhat successful: while I was able to create spheres with a thin membrane that were liquid on the inside, they all stuck together in both the algin bath and in the water bath, leaving me with large blobs of coconut “caviar”:

Sorry, it's kind of hard to see the spheres.

Sorry, it’s kind of hard to see the spheres.

I attempted a few larger spheres using a spoon, but was unsuccessful. I’ll try to refine this technique later. On to the iced tea spheres and the basic spherification method! This was much more successful. This time, I made a bath of calcium chloride and added sodium alginate to the iced tea. Once again, I piped drops of iced tea into the bath, then scooped up the spheres into a water bath to rinse them off:

IMAG0378

I ended up with lots of individual spheres that were very tasty. Here are some pictures:

IMAG0426

IMAG0425

A cool close-up. Photo credit: my sister.

A cool close-up. Photo credit: my sister.

By doing both coconut juice and iced tea, I learned that it is better to use very colorful liquids with strong flavors in spheres for maximum effect. I’m excited to try this with other liquids! Maybe mango puree next time?

Cooking Spaghetti

Posted in Basic Cooking Skills with tags , , , , , , , on February 4, 2013 by Ryan

In keeping with my theme of pasta, a few nights ago I decided to cook spaghetti and meat sauce before starting to experiment with molecular gastronomy. I was under a little bit of a time crunch, so I used dried noodles instead of making them from scratch like last time. I started with three main ingredients:

IMAG0344IMAG0347 IMAG0345

Using my previously learned techniques, I chopped some onions and garlic, browning them before adding some of the thawed ground beef to a pan.

Beautifully pink.

Pink!

Meanwhile, I put a pot of water, oil, and salt on another burner to boil while the meat cooked. A few minutes later, and BAM!

IMAG0353

Sauce and pasta are simmering simultaneously. This began to test my pitiful multitasking ability, since the brown rice pasta requires near-constant stirring and the sauce needed to heat up enough without overcooking the ground beef. I was able to keep tabs on both at the same time, until the pasta was done cooking. I strained it, rinsed it under cold water, and dumped it into the sauce pan. After a few stirs, I was left with:

I wish I could eat this right now.

I wish I could eat this right now.

It was so good. I squeezed some lime juice and grated some parmesan cheese on top, which was like the cherry on top. Even though pasta is a fairly simple dish to cook, I feel confident enough that I’m going to start experimenting with spherification next! Keep on the lookout for my next post!